Introduction
The LEMP software stack is a group of software that can be used to serve dynamic web pages and web applications. This is an acronym that describes a Linux operating system, with an Nginx web server. The backend data is stored in the MySQL database and the dynamic processing is handled by PHP.
In this guide, we will demonstrate how to install a LEMP stack on an Ubuntu 16.04 server. The Ubuntu operating system takes care of the first requirement. We will describe how to get the rest of the components up and running.
Prerequisites
Before you complete this tutorial, you should have a regular, non-root user account on your server with sudo privileges. You can learn how to set up this type of account by completing our Ubuntu 16.04 initial server setup.
Once you have your user available, sign into your server with that username. You are now ready to begin the steps outlined in this guide.
Step 1: Install the Nginx Web Server
In order to display web pages to our site visitors, we are going to employ Nginx, a modern, efficient web server.
All of the software we will be using for this procedure will come directly from Ubuntu's default package repositories. This means we can use the apt package management suite to complete the installation.
Since this is our first time using apt for this session, we should start off by updating our local package index. We can then install the server:
- sudo apt-get update
- sudo apt-get install nginx
On Ubuntu 16.04, Nginx is configured to start running upon installation.
If you are have the ufw firewall running, as outlined in our initial setup guide, you will need to allow connections to Nginx. Nginx registers itself with ufw upon installation, so the procedure is rather straight forward.
It is recommended that you enable the most restrictive profile that will still allow the traffic you want. Since we haven't configured SSL for our server yet, in this guide, we will only need to allow traffic on port 80.
You can enable this by typing:
- sudo ufw allow 'Nginx HTTP'
You can verify the change by typing:
You should see HTTP traffic allowed in the displayed output:
Output
Status: active
To Action From
-- ------ ----
OpenSSH ALLOW Anywhere
Nginx HTTP ALLOW Anywhere
OpenSSH (v6) ALLOW Anywhere (v6)
Nginx HTTP (v6) ALLOW Anywhere (v6)
With the new firewall rule added, you can test if the server is up and running by accessing your server's domain name or public IP address in your web browser.
If you do not have a domain name pointed at your server and you do not know your server's public IP address, you can find it by typing one of the following into your terminal:
- ip addr show eth0 | grep inet | awk '{ print $2; }' | sed 's/\/.*$//'
This will print out a few IP addresses. You can try each of them in turn in your web browser.
As an alternative, you can check which IP address is accessible as viewed from other locations on the internet:
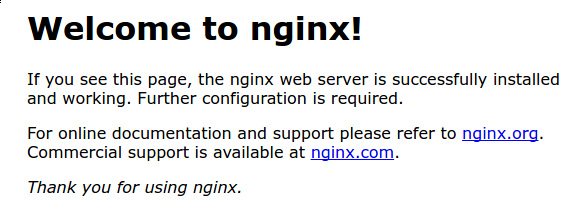
Type one of the addresses that you receive in your web browser. It should take you to Nginx's default landing page:
http://server_domain_or_IP

If you see the above page, you have successfully installed Nginx.
Step 2: Install MySQL to Manage Site Data
Now that we have a web server, we need to install MySQL, a database management system, to store and manage the data for our site.
You can install this easily by typing:
- sudo apt-get install mysql-server
You will be asked to supply a root (administrative) password for use within the MySQL system.
The MySQL database software is now installed, but its configuration is not exactly complete yet.
To secure the installation, we can run a simple security script that will ask whether we want to modify some insecure defaults. Begin the script by typing:
- sudo mysql_secure_installation
You will be asked to enter the password you set for the MySQL root account. Next, you will be asked if you want to configure the VALIDATE PASSWORD PLUGIN.
Warning: Enabling this feature is something of a judgment call. If enabled, passwords which don't match the specified criteria will be rejected by MySQL with an error. This will cause issues if you use a weak password in conjunction with software which automatically configures MySQL user credentials, such as the Ubuntu packages for phpMyAdmin. It is safe to leave validation disabled, but you should always use strong, unique passwords for database credentials.
Answer y for yes, or anything else to continue without enabling.
VALIDATE PASSWORD PLUGIN can be used to test passwords
and improve security. It checks the strength of password
and allows the users to set only those passwords which are
secure enough. Would you like to setup VALIDATE PASSWORD plugin?

Press y|Y for Yes, any other key for No:
If you've enabled validation, you'll be asked to select a level of password validation. Keep in mind that if you enter 2, for the strongest level, you will receive errors when attempting to set any password which does not contain numbers, upper and lowercase letters, and special characters, or which is based on common dictionary words.
There are three levels of password validation policy:

LOW    Length >= 8
MEDIUM Length >= 8, numeric, mixed case, and special characters
STRONG Length >= 8, numeric, mixed case, special characters and dictionary                  file

Please enter 0 = LOW, 1 = MEDIUM and 2 = STRONG: 1
If you enabled password validation, you'll be shown a password strength for the existing root password, and asked you if you want to change that password. If you are happy with your current password, enter n for "no" at the prompt:
Using existing password for root.

Estimated strength of the password: 100
Change the password for root ? ((Press y|Y for Yes, any other key for No) : n
For the rest of the questions, you should press Y and hit the Enter key at each prompt. This will remove some anonymous users and the test database, disable remote root logins, and load these new rules so that MySQL immediately respects the changes we have made.
At this point, your database system is now set up and we can move on.
Step 3: Install PHP for Processing
We now have Nginx installed to serve our pages and MySQL installed to store and manage our data. However, we still don't have anything that can generate dynamic content. We can use PHP for this.
Since Nginx does not contain native PHP processing like some other web servers, we will need to install php-fpm, which stands for "fastCGI process manager". We will tell Nginx to pass PHP requests to this software for processing.
We can install this module and will also grab an additional helper package that will allow PHP to communicate with our database backend. The installation will pull in the necessary PHP core files. Do this by typing:
- sudo apt-get install php-fpm php-mysql
We now have our PHP components installed, but we need to make a slight configuration change to make our setup more secure.
Open the main php-fpm configuration file with root privileges:
- sudo nano /etc/php/7.0/fpm/php.ini
What we are looking for in this file is the parameter that sets cgi.fix_pathinfo. This will be commented out with a semi-colon (;) and set to "1" by default.
This is an extremely insecure setting because it tells PHP to attempt to execute the closest file it can find if the requested PHP file cannot be found. This basically would allow users to craft PHP requests in a way that would allow them to execute scripts that they shouldn't be allowed to execute.
We will change both of these conditions by uncommenting the line and setting it to "0" like this:
/etc/php/7.0/fpm/php.ini
cgi.fix_pathinfo=0
Save and close the file when you are finished.
Now, we just need to restart our PHP processor by typing:
- sudo systemctl restart php7.0-fpm
This will implement the change that we made.
Now, we have all of the required components installed. The only configuration change we still need is to tell Nginx to use our PHP processor for dynamic content.
We do this on the server block level (server blocks are similar to Apache's virtual hosts). Open the default Nginx server block configuration file by typing:
- sudo nano /etc/nginx/sites-available/default
Currently, with the comments removed, the Nginx default server block file looks like this:
/etc/nginx/sites-available/default
server {
    listen 80 default_server;
    listen [::]:80 default_server;

    root /var/www/html;
    index index.html index.htm index.nginx-debian.html;

    server_name _;

    location / {
        try_files $uri $uri/ =404;
    }
}
We need to make some changes to this file for our site.
- First, we need to add
index.php as the first value of our index directive so that files named index.php are served, if available, when a directory is requested. - We can modify the
server_name directive to point to our server's domain name or public IP address. - For the actual PHP processing, we just need to uncomment a segment of the file that handles PHP requests. This will be the
location ~\.php$ location block, the included fastcgi-php.conf snippet, and the socket associated with php-fpm. - We will also uncomment the location block dealing with
.htaccess files. Nginx doesn't process these files. If any of these files happen to find their way into the document root, they should not be served to visitors.
The changes that you need to make are in red in the text below:
/etc/nginx/sites-available/default
server {
    listen 80 default_server;
    listen [::]:80 default_server;

    root /var/www/html;
    index index.php index.html index.htm index.nginx-debian.html;

    server_name server_domain_or_IP;

    location / {
        try_files $uri $uri/ =404;
    }

    location ~ \.php$ {
        include snippets/fastcgi-php.conf;
        fastcgi_pass unix:/run/php/php7.0-fpm.sock;
    }

    location ~ /\.ht {
        deny all;
    }
}
When you've made the above changes, you can save and close the file.
Test your configuration file for syntax errors by typing:
If any errors are reported, go back and recheck your file before continuing.
When you are ready, reload Nginx to make the necessary changes:
- sudo systemctl reload nginx
Step 5: Create a PHP File to Test Configuration
Your LEMP stack should now be completely set up. We can test it to validate that Nginx can correctly hand .php files off to our PHP processor.
We can do this by creating a test PHP file in our document root. Open a new file called info.php within your document root in your text editor:
- sudo nano /var/www/html/info.php
Type or paste the following lines into the new file. This is valid PHP code that will return information about our server:
/var/www/html/info.php
<?php
phpinfo();
When you are finished, save and close the file.
Now, you can visit this page in your web browser by visiting your server's domain name or public IP address followed by /info.php:
http://server_domain_or_IP/info.php
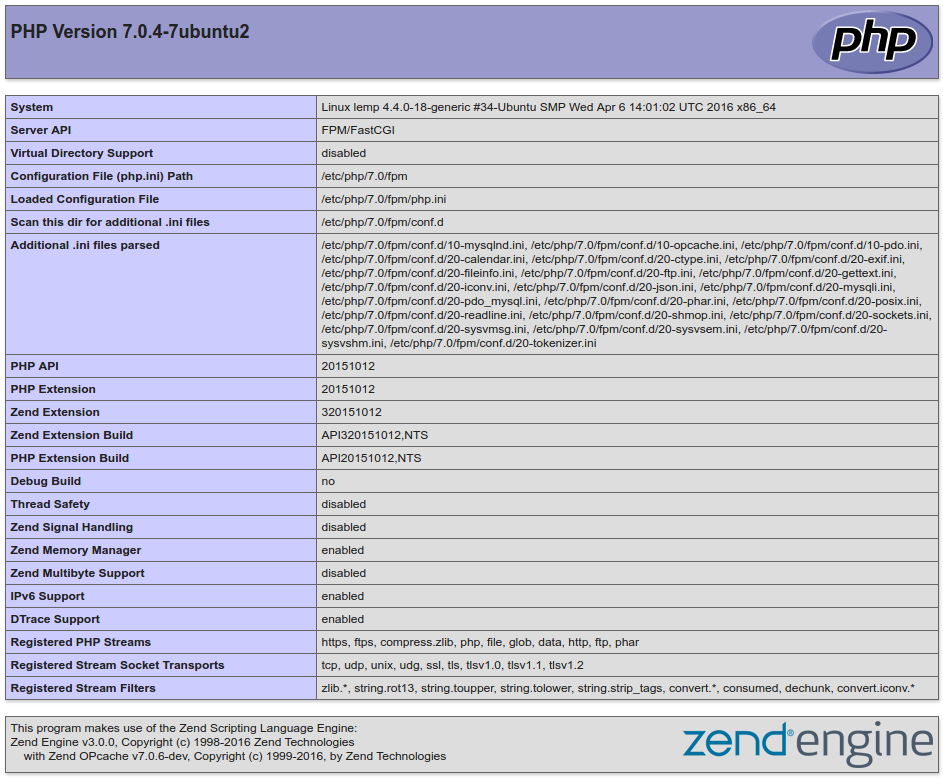
You should see a web page that has been generated by PHP with information about your server:

If you see a page that looks like this, you've set up PHP processing with Nginx successfully.
After verifying that Nginx renders the page correctly, it's best to remove the file you created as it can actually give unauthorized users some hints about your configuration that may help them try to break in. You can always regenerate this file if you need it later.
For now, remove the file by typing:
- sudo rm /var/www/html/info.php
Conclusion
You should now have a LEMP stack configured on your Ubuntu 16.04 server. This gives you a very flexible foundation for serving web content to your visitors.
https://www.digitalocean.com/community/tutorials/how-to-install-linux-nginx-mysql-php-lemp-stack-in-ubuntu-16-04


